How to add Font Awesome Icons in WordPress Menus
Font Awesome is an icon font with more than 600+ scalable vectors icons that are all customizable via CSS and you can simply change the icons’ colors to match your website style sheet, you can add drop-down shadows, change font size, and more… Font awesome icon font is the mostly used icons by websites all over the world.
Most importantly, font awesome originally designed for Twitter Bootstrap and setting up Font Awesome can be very simple as adding two lines of code to your website. Font Awesome plays nicely with Bootstrap 3 obviously. You don’t have to use any JavaScript, php or any other language to make use of these icons and they have very less compatibility issues as well.
Usually, in order to install Font Awesome icon font in any website is to paste the following code above the </head> section of your site’s HTML:
<link rel="stylesheet" href="https://maxcdn.bootstrapcdn.com/font-awesome/4.5.0/css/font-awesome.min.css">
Well, in this article, I’m going to show you how to add Font Awesome icons in WordPress menus very easily. You might think that why specifically for WordPress menus?
Well, fair enough because installing Font Awesome icon font in any website is not a difficult task but it is a bit complicated when it comes to add icons in WordPress menus.
Font Awesome 4 Menus in WordPress
So, here is what I’m going to do. Font Awesome 4 Menus is a WordPress plugin which we are going to use to add font awesome icons in WordPress menus without touching a single line of code. Hope that sounds good.
Step #1: Install Font Awesome 4 Menus in WordPress
Install and activate Font Awesome 4 Menus plugin in your WordPress site and move on to the Appearance > Menus
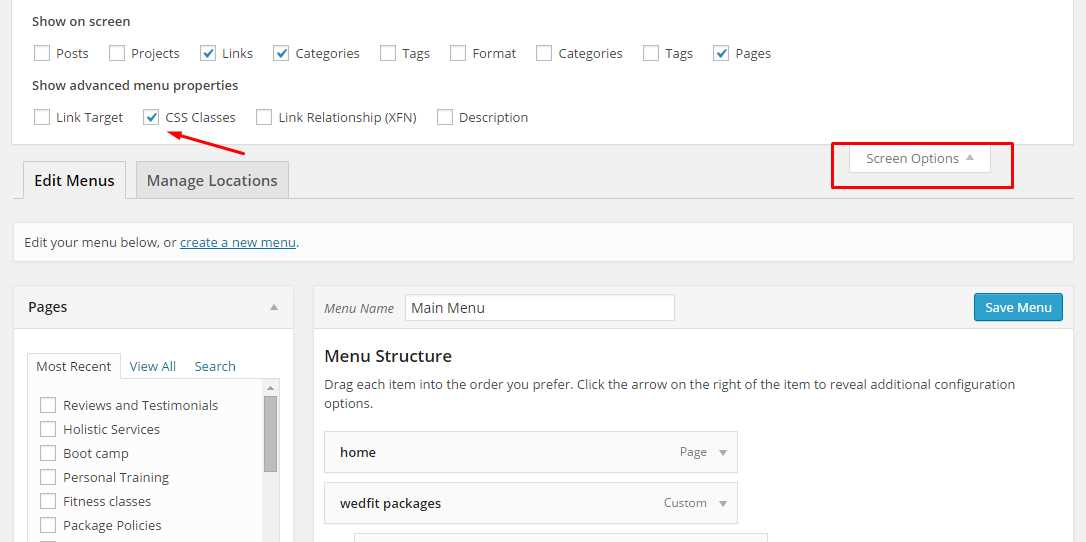
Step #2: Tick CSS Classes Option on Screen Options
On Appearance >Menus, click on the screen options from top right corner of the page and when the drop-down menu is activated just tick the “CSS Classes” option. As shown in the screenshot here:
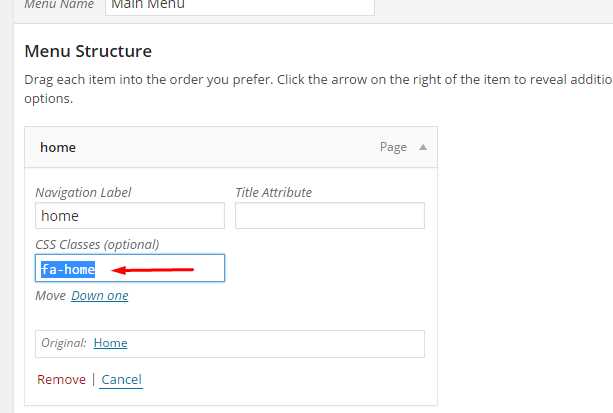
Step #3: Adding Icon in WordPress Menus
Adding icon in WordPress menus is really simple yet it is like taking a cup of tea with bread 😛 In order to add icon in the menu click the menu item and it will toggle down where you will see CSS Classes (optional) field, now this is where you have to add fa-(icon name) as a CSS class to your menu and then the plugin will automatically pull out the icon from Font Awesome icon font.
For example: fa-home <- what this CSS class will do? It will grab the home icon and display it with the menu item. For instance see this:
Conclusion
You have successfully added the icon from Font Awesome on your WordPress menus.
![]()
In addition, Font Awesome 4 have also given you shortcodes that you might wanna use across your blog posts/pages and custom post types to display font icons.
Use the shortcodes available:
- Add a single home icon: [fa class=”fa-home”]
- Add a stacked Twitter icon: [fa-stack][fa class=”fa-square-o fa-stack-2x”][fa class=”fa-twitter fa-stack-1x”][/fa-stack]
If you have any problem while going through the process above, just put your comment below we will get back to you as soon as possible.