How to Root BlueStacks 3 Latest Version of Android Emulator
BlueStacks Android emulator/app player comes with all new latest version 3.0 and people have started to download. You can download BlueStacks 3 and install Android apps on your PC.
You can also get BlueStacks 2.0 and BlueStacks rooted for your PC. But more importantly, we are going to give you a thorough on how to root BlueStacks 3 latest version of Android emulator.
[loop type=glossary name=android-rooting count=1]
What is [field title]?
[content]
[/loop]
The BlueStacks developers did really great work in providing world’s best Android app emulator for Windows and Mac OS users. As we know that 3.0 is the latest version of the Android emulator and people are not able to root it by following various rooting guides available on internet. Since, those guides are supposed to be out dated and you will have to find a new way to root Bluestacks 3.
Our team, did found solution to root BlueStacks 3 and we are going to write this article especially for that purpose.
Pre-requisites
- Make sure your laptop is charged more than 70%
- Install BlueStacks 3
- Run it
How to Root BlueStacks 3
After downloading and installing BlueStacks 3 on your PC, you have to follow the step by step guidelines below to root the emulator:
- Download Bluestack Tweaker program that will be used to root Bluestacks 3 Android emulator
- Its size is 74.3 MB and the time to download depends on your internet connection (Usually, takes a few minutes)
- Once done, extact the .zip file and open up the folder
- Copy the files named: BlueStacksTweaker3.exe and bs.dll and drop it inside BlueStacks 3 folder where you have installed it (for me: C:\Program Files (x86)\BlueStacks)
- After adding the BS tweaker file inside root folder of BlueStacks, run it as administrator
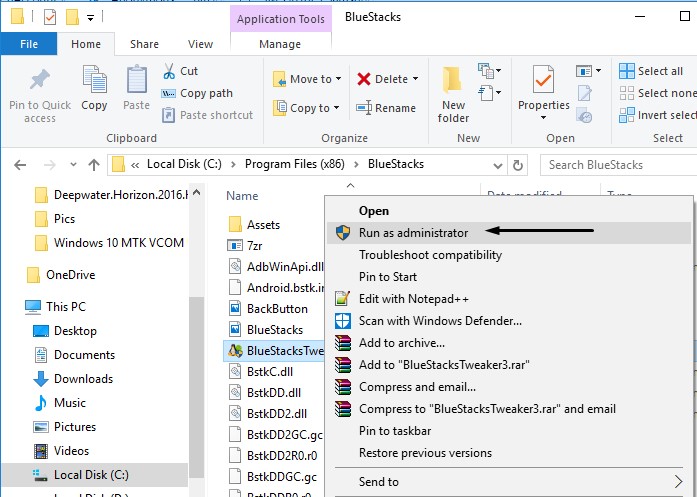
- You must run this BS Tweaker as administrator because you won’t be able to root properly
- Go back to Main tab, click Start BS button
- Inside BS Tweaker, you have to go to Helpers → Root for BlueStacks → Tick Unlock
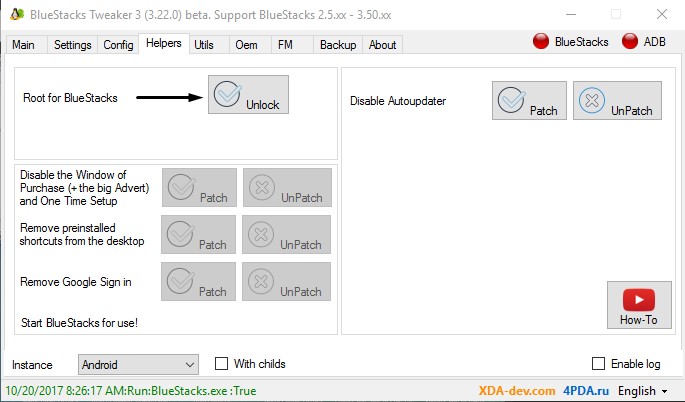
- It will take a few seconds and display Green message that says TRUE
- Just wait and see the BlueStacks 3 running (it might take a few seconds depending on your computer performance
- You have successfully rooted BlueStacks 3 and now you can enjoy apps and games that requires root to install
How to manage root permissions on BlueStacks 3 (Root privileges)
If you have successfully rooted BlueStacks 3 then it’s time to manage root permissions for specific apps and games. Follow the steps to learn how to manage root permissions:
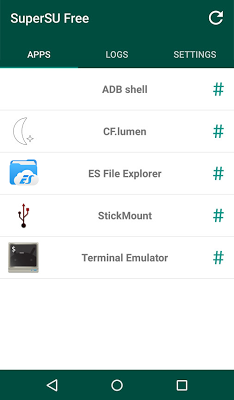
- Install Super SU Android app on your BlueStacks 3
- Just search Super SU app in BlueStacks and install it if you are not able to install
- SuperSU app will enable advanced management of Superuser access rights
- It is for all the apps on your device that need root
- SuperSU has been built from the ground up to counter a number of problems with other Superuser access management tools
So, if you have SuperSU Android app installed on your PC emulator, you can easily have root manager on BlueStacks 3. Root manager can help you manage root permissions for any app or game you want and whenever.
However, if you think that your BlueStacks 3 is not rooted so it is not working, just reboot it. After rebooting, Google Play Store should be working properly and you just have to follow the guide below to see root status.
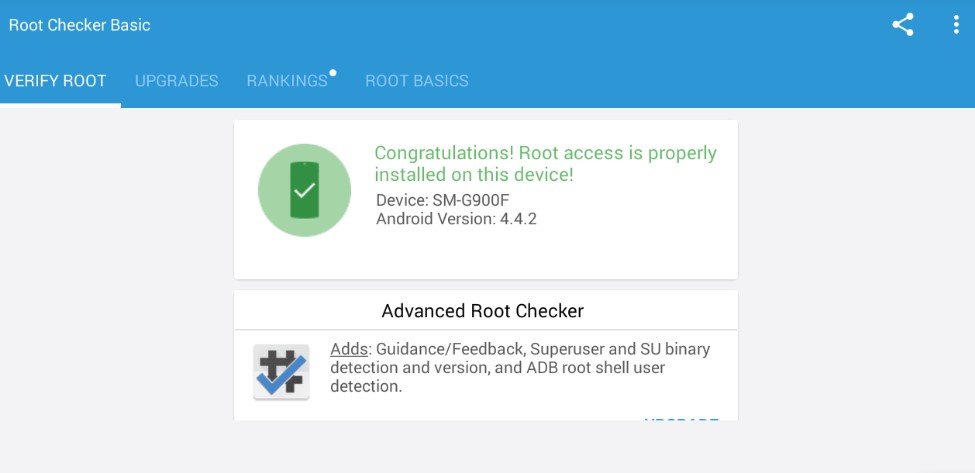
How to check if BlueStacks 3 is rooted
To check if you have successfully rooted your Bluestacks 3 Android emulator on your PC, follow the steps below:
- Search Root Checker on your Google Play store in BS emulator
- You will see the root checker app on top of the search results, click the root checker app and install

- The working of this app is completely easy just run the app
- Root checker will display the root status (Whether it is rooted or not)
That’s the simplest guide which helps you to root BlueStacks 3.
HelIo
i can not click root for bluestacks> unlock it is gray so I can not root it please help me please!!!
Are you sure? Make sure you run Bluestacks as ADMINISTRATOR.