
How to: Add Social Sharing Buttons Below Post Info in Genesis?
In this article, I’m going to show you about how we can add pretty good-looking colorful social sharing buttons (SSB) in Genesis Framework just below post info. I think many of us might not understand that what the word “Post Info” refers to. Post info is simply the info about the post which usually contains “author name, date and number of comments” and can be seen below, above the title and at the bottom of the post.
Well, SSB will help your blog readers to call-to-action on one click and share your articles with their friends using social media buttons very easily. This is what many of people are willing to add into their sites. Here comes a very definitive guide for adding SSB in your blog which uses Genesis.
Currently I’ve integrated the buttons of some most popular social sharing websites i.e, Google+, Facebook, Twitter, LinkedIn, StumbleUpon but can be reduced/added on request. Feel free to comment if you want additional buttons.
Add Social Sharing Buttons Below Post Info in Genesis
1. Genesis Simple Hooks Plugin
First of all, we need a WordPress plugin for codes hooking purpose in the rest of Genesis Framework and in my opinion Genesis Simple Hooks is great. In order to add social sharing buttons below post info, we need this plugin for hooking codes like HTML, PHP, Javascript, etc in the Genesis Framework.
2. JavaScripts in Footer
Now, add JavaScripts for social sharing buttons in the footer, don’t know how to do this. Okay, let me explain a little bit more about how to use that Genesis simple hooks plugin.
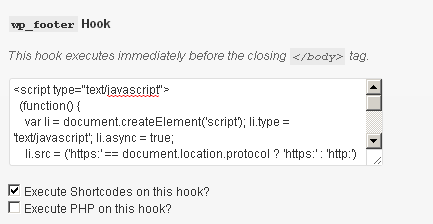
Go to Genesis Tab> Simple Hooks, check out the very first section on this page called WordPress hooks, simply put the following JavaScripts in wp_footer hook:
<script type="text/javascript">
 (function() {
 var li = document.createElement('script'); li.type = 'text/javascript'; li.async = true;
 li.src = ('https:' == document.location.protocol ? 'https:' : 'http:') + '//platform.stumbleupon.com/1/widgets.js';
 var s = document.getElementsByTagName('script')[0]; s.parentNode.insertBefore(li, s);
 })();
</script>
<script type="text/javascript">
 (function() {
 var po = document.createElement('script'); po.type = 'text/javascript'; po.async = true;
 po.src = 'https://apis.google.com/js/plusone.js';
 var s = document.getElementsByTagName('script')[0]; s.parentNode.insertBefore(po, s);
 })();
</script>
<script type="text/javascript" src="//platform.twitter.com/widgets.js"></script>
<script type="text/javascript" src="//platform.linkedin.com/in.js"></script>
Note: don’t forget to check box “Execute Shortcodes on this hook?” better to see the following image:
3. Adding HTML for Social Sharing Buttons
Now, we’re going to hook some HTML codes, just by going to Genesis > Simple Hooks and paste the following codes in genesis_after_post_title hook, again don’t forget to check box “Execute PHP on this Hook?” and “Execute Shortcodes on this hook?“:
<?php if (is_single() | is_page() ) { ?>
<p><div class="social-button">
<div class="social-button" id="twitter">
<a href="http://twitter.com/share" class="twitter-share-button" data-url="<?php the_permalink() ?>" data-text="<?php the_title(); ?>" data-count="horizontal" data-via="@Haroonbro.">Tweet</a>
 </div>
<div class="social-button" id="facebook">
<div id="likebutton"><iframe src="https://www.facebook.com/plugins/like.php?href=<?php echo rawurlencode(get_permalink()); ?>&layout=button_count&show_faces=false&width=100&action=like&font=verdana
&colorscheme=light&height=21" scrolling="no" frameborder="0" style="border:none; overflow:hidden; width:100px; height:21px;" allowTransparency="true"></iframe>
</div>
</div>
<div class="social-button" id="googleplus">
<g:plusone size="medium" href="<?php the_permalink(); ?>"></g:plusone>
</div>
<div class="social-button" id="linkedin">
<script type="in/share" data-url="<?php the_permalink(); ?>" data-counter="right"></script>
</div>
<div class="social-button" id="stumbleupon">
<su:badge layout="1" location="<?php the_permalink() ?>"></su:badge>
</div>
</div></p><br>
<?php } ?>
Remember: don’t forget to change the name from Twitter HTML coding section data−via=”Haroonbro”.
4. Lastly, Styling the Social Sharing Buttons
It’s time to give a better look to ‘SSB‘. For this, I myself made a very attractive CSS codes for it see right over here:
Now, put the following CSS codes at the end of style.css file, by going Appearance > Editor:
.social-button{
     float: right;
     margin-right: 3px;
     height: 20px;
     padding: 6px;
     margin-bottom: 12px;
}
.social-button#twitter{
     background: #CCF0F4;
     width: 118px;
}
.social-button#facebook{
     background: #92A7CC;
     width: 100px;
}
.social-button#googleplus{
     background: #F88282;
     width: 100px;
}
.social-button#linkedin{
     background:#90B6F2;
     width: 100px;
}
.social-button#stumbleupon{
     background: #FFC379;
     width: 100px;
}
Congrats… You did it.

Thanks Muhammad
This is exactly what I was looking for. It’ll save me hours of messing about.
Regards, Matt.
Your very welcome @Matt Haselden. Keep visiting Softstribe.
Mohammad Bro it would be great if you can update the codes. I implemented your codes. Everything works fines but Stumbleupon and linkedin icons aren’t showing up.
Hi @Nareder Chopra,
Thanks for the comment and letting me know about the bug… I’ve updated the codes brother, feel free to use the updated codes.
You have totally made my day. Now I just hope I get this right since I’m a newbie. How about a button for Pinterest?
Yes, I’ll update the codes and Pinit button too if you want right in there…
But right now, I’m working to convert these social sharing buttons into a WordPress plugin so you can specify whether a social media button should be shown or not… I hope this would be a great Idea.
Hi Muhammad,
I also use Genesis News Theme. Can you please tell me how did you increase the font in Fancy Dropdowns of a menu? Thanks in advance brother.
Hi @Naser, your welcome. Yes, I can tell you why not brother…
Follow the steps below to increase the font in Fancy dropdown menu:
1. Go to Appearance > Editor
2. Press Ctrl + F and paste this css statement “#nav li li a” without quotes
3. Now you can see the code something like:
#nav li li a,
#nav li li a:link,
#nav li li a:visited {
	background: url(images/bg-dark.png);
	border: 1px solid #444;
	border-top-width: 0;
	color: #fff;
	font-size: 11px;
	padding: 5px 10px;
	position: relative;
	text-transform: none;
	width: 118px;
}
4. In the above code you can see the font-size is 11 pixels change 11px to 15px. That’s it… 🙂
hey bro any idea how to make the buttons large???
Just replace the JavaScripts of small buttons with extra large social buttons. You must create the social media buttons from scratch.
Hi Muhammad, your post is very useful for me. How can I change buttons’order?
Thank you
Hi @Dejavu, your very welcome. BTW, you can simply change the orders by changing the orders of HTML codes from starting div tag to ending div tag and kindly place the whole section after the closing div of another button.
Hi there,
Thanks for the great article Muhammad Haroon. But I’m not a Genesis user better if you will write an article for non-Genesis users about adding social sharing buttons after post title.
I would be very thankful to you.
Well, Your very welcome @Shahnawaz. Oh Yeah! you are right. I should also write an article for non-Genesis users. Soon I will write an article about it.
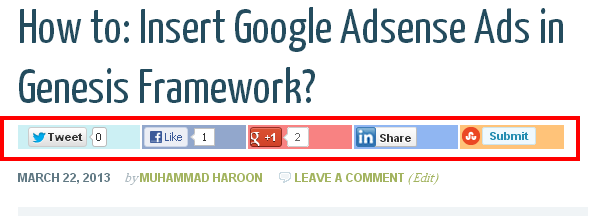
Wait, the title says below post info, but the screenshot you provided shows above post info? Good post, through I’ll try not to hardcode it (if possible) to the theme since the code/API for those social buttons will be updated anytime.
Eh! It’s just a screenshot of social sharing buttons that will look like after implementing dude. The method is completely changed and you will be able to add social buttons after Genesis post info.
Hi Muhammad, I love what you share here.I used your code for my site and it worked very well. Could you show me how to change the code to make a facebook share box with comment shows up after clicking the facebook like button. Like this: https://developers.facebook.com/docs/reference/plugins/like/
Thank you